Propagating plants from cuttings is one of the most rewarding and sustainable gardening practices. It allows you to multiply favorite plants, create gifts for friends, and extend the life of mature specimens. From softwood herbs to hardy houseplants, cuttings can be an easy and budget-friendly way to expand your garden. This guide will walk you through every step—from choosing the right parent plant to rooting and caring for new growth.
Why Propagate from Cuttings?
Propagating from cuttings offers several advantages. It’s faster than growing from seed, yields clones of the parent plant preserving its appearance and vigor, and is eco-friendly. You also avoid hybrid unpredictability and ensure health traits remain identical. With some patience, most cuttings can transform into thriving new plants within weeks.
Understanding Cutting Types
Different plants root best from specific types of cuttings. These include:
Softwood cuttings: Taken from new, non-woody growth in spring or early summer (e.g., coleus, basil, geranium). They root quickly but need humidity and warmth.
Semi-hardwood cuttings: Taken from partially mature growth in midsummer (e.g., camellia, hydrangea). They hold moisture well and root steadily.
Hardwood cuttings: Taken from fully mature, woody late-season stems (e.g., roses, currants, figs). They need cooler conditions and take longer to root.
Leaf or leaf-bud cuttings: Used for plants like African violets, peperomias, and some succulents. A leaf or leaf-bud segment produces plantlets.
Choosing the correct type ensures a higher success rate.
Tools and Materials Needed
To propagate effectively, gather:
- A clean, sharp knife or pruning shears
- A rooting medium (coarse sand, perlite, or propagation mix)
- Small pots or containers
- Rooting hormone (optional, but helpful for woody cuttings)
- Labels and waterproof marker
- Clear plastic bag or propagation tray with dome
- Spray bottle with water
Sanitize tools with alcohol to prevent disease spread between plants.
How to Prepare Cuttings
Choose healthy, disease-free parent plants with strong growth. Early morning is the best time for cutting because turgor (water pressure) is high.
Make a clean cut just below a leaf node (for stem cuttings) or at the base of a leaf for leaf cuttings. Remove lower leaves, leaving two to four at the top. For hardwood cuttings, collect 10–15 cm (4–6 in) stems with several buds. Dip the cut end in rooting hormone for better root development.
Semi-hardwood and softwood cuttings should be cut at a 45° angle and placed directly into a moist rooting mix. For leaf cuttings, insert the petiole at a slight angle into the medium to encourage root formation.
Creating the Ideal Rooting Environment
Place cuttings upright in a moist, well-draining mix such as equal parts peat and perlite, or a seed-starting mix. Water lightly and cover with a plastic dome or clear bag to maintain high humidity.
Put the container in bright but indirect light. Avoid direct sun, which can overheat cuttings. Ideal temperatures are 65–75 °F (18–24 °C). For softwood cuttings, add a small heat mat if propagation conditions are cool.
Open the dome daily for a few minutes to allow fresh air and prevent mold. Mist the cuttings lightly to maintain humidity.
Common Mistakes to Avoid
Avoid burying too much of the cutting, as this can cause rot. Don’t overwater—keep the medium moist, not soggy. Too much direct sun causes fungus, and too little light delays rooting.
Using fresh and sterilized media prevents disease and improves success. Skip hormone only for easy-to-root plants; more reluctant species benefit significantly from rooting gel or powder.
Timing and Rooting Time
Softwood cuttings root quickly—within 2–4 weeks. Semi-hardwood can take 4–8 weeks, while hardwood cuttings may take months. Leaf cuttings vary depending on species; African violets can show roots and tiny plantlets in 3–4 weeks.
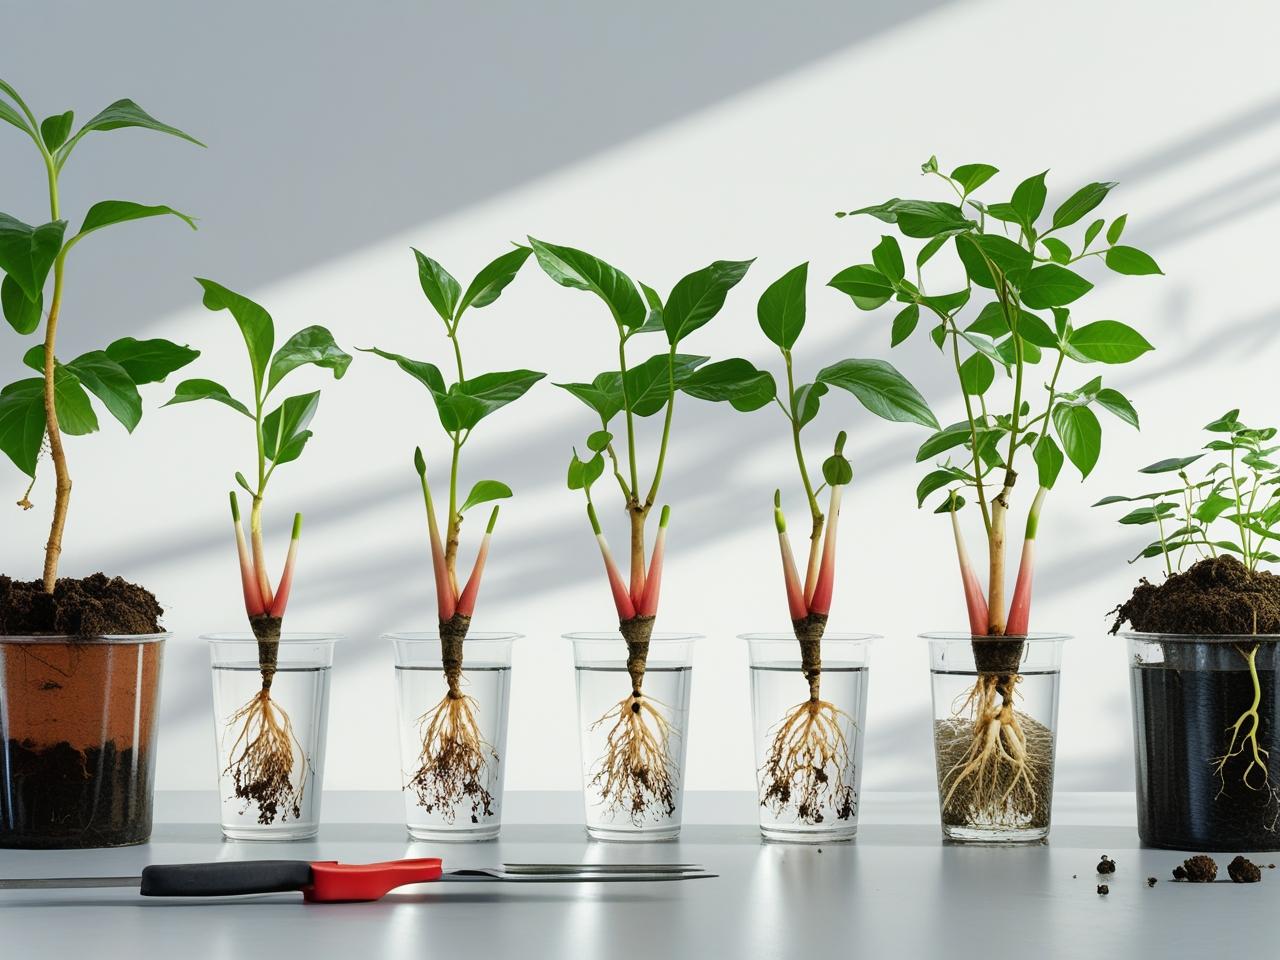
Take time and check periodically. Gently tug a cutting—if it resists, roots have formed. Some species show visible roots through transparent pots.
Once strong roots develop, transition to more open air. Start by cracking the dome a bit each day, then fully remove it after a few days. Continue watering sparingly until the plant establishes.
Transitioning to Potting Up
When rooted cuttings show steady top growth and healthy roots, it’s time to transplant. Choose a slightly larger pot with good drainage and high-quality potting soil. Plant gently, water well, and return to indirect light for a few days before reintroducing to brighter spots.
For outdoor plants, wait until threat of frost passes and roots are strong. Harden off outside in partial shade for a week before planting out.
Hardening Off and Planting Outdoors
Gradually acclimate rooted cuttings to outdoor conditions:
- Move the pot outdoors in the morning and bring back each evening.
- Over five to seven days, increase outdoor exposure to full sun and temperature shifts.
- Plant in prepared garden soil, water well, and mulch around the base to reduce stress.
Caring for New Plants
New plantlets benefit from regular care. Keep soil evenly moist but not wet; fertilize lightly with diluted feed after a month. Monitor for pests or fungus, reinforcing airflow and preventing overcrowding.
Transplant again when roots begin to circle the pot, or annual growth fills the space.
Propagation Tips by Plant Type
Herbs (basil, mint, rosemary): Root quickly in water or soil under light and warmth. Keep cuttings in indirect light and repotted once roots are 2–3 cm (1 in).
Houseplants (philodendron, pothos, monstera): Root in water or soil—water propagation allows easy observation of roots. When roots reach 5–7 cm (2–3 in), transplant to soil.
Succulents and cacti: Use leaf or stem cuttings. Allow ends to callus for a few days before placing on dry soil. Water lightly after two weeks.
Shrubs and trees (hydrangea, viburnum, sage, currants): Semi-hardwood cuttings take root well in late summer. Keep warm, damp, and shaded until roots develop.
Scaling Propagation Projects
Once comfortable, try propagating multiple plants with trays or labeled pot systems. Join exchanges with fellow gardeners. Share your propagules as gifts or sell them at local plant swap events or community markets.
Benefits for Garden Diversity
Propagating plants allows you to preserve unique cultivars or rare species. It also empowers you to multiply mature plants rapidly and share them with others. It supports genetic diversity and deepens your connection with the creation process.
Troubleshooting Propagation Issues
If cuttings fail to root, first assess conditions. Was the cutting taken from unhealthy material? Was the medium consistently damp and filtered light provided? Adjust by using fresh leaves, improving warmth, or adding rooting hormone.
Persistent rot indicates too much humidity or lack of airflow—thin the dome or mist less. If mold appears, remove affected cuttings and increase space between sections.
Final Thoughts
Propagating from cuttings is an empowering skill that connects gardeners to their plants in a intimate, replicative process. With minimal tools, some patience, and proper environment control, you can multiply your favorite specimens, fill your home or garden with greenery, and give life to new plant generations. Each successful root gives satisfaction and signals deeper plant awareness. Whenever you’re ready, I can help tailor propagation plans for specific species or take the next steps into advanced techniques!