Creating a terrarium is like bringing a miniature garden into your home. Whether you choose an open, desert-style terrarium or a closed, jungle-like ecosystem, assembling one step by step offers a rewarding and creative experience. In this guide, you’ll learn everything from selecting containers and plants to maintaining your little habitat so it thrives for months and even years.
What Is a Terrarium and Why Make One?
A terrarium is a small, self-contained glass garden. It can be open or closed, depending on the plants you choose. Closed terrariums create a humid, greenhouse-like environment, while open ones mimic dry, arid habitats. Many people are drawn to terrariums because they’re low-maintenance, decorative, and perfect for small spaces.
Making a terrarium offers many benefits. They’re fun to design, compact enough for desktops, shelves, or windowsills, and they help teach ecological principles like water cycles and plant care. Plus, terrariums are conversation starters and stress relievers—perfect for enhancing home or office décor.
Step 1: Choose Your Container
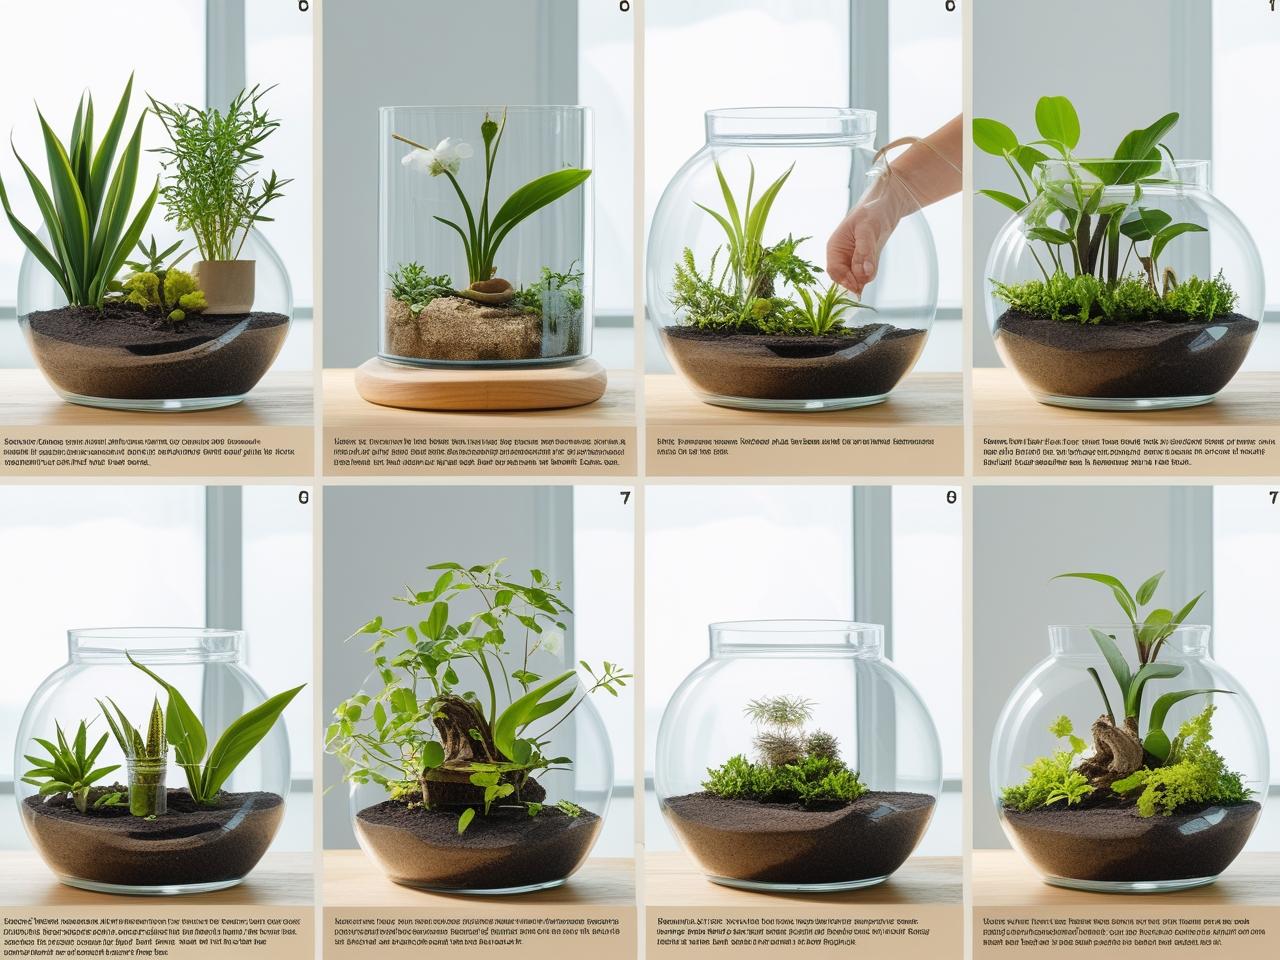
Pick a container that matches the type of terrarium you want. Clear glass is essential to allow light and create visual depth. Mason jars, glass fish bowls, apothecary jars, cloches, or repurposed vases are all popular choices.
For closed terrariums, select a container with a lid to retain moisture. For open terrariums, wide-mouth containers allow for easier airflow and maintenance. Regardless, ensure the container is clean and blemish-free before starting.
Step 2: Select Appropriate Plants
The key to a thriving terrarium is choosing plants that enjoy the same conditions. Here’s how to decide:
For a closed terrarium, pick moisture-loving plants such as fittonia (nerve plant), small ferns, mosses, baby tears (soleirolia), or peperomia. These plants enjoy humidity and low to medium light.
For an open terrarium, go for succulents like echeveria, haworthia, or small cacti. These plants require good ventilation and plenty of light without stagnant moisture.
Choose plant sizes that leave enough space for growth and avoid crowding. Choosing beginner-friendly plants helps ensure your terrarium thrives even if you don’t have prior gardening experience.
Step 3: Gather Your Materials
Beyond the container and plants, you’ll need:
- Small pebbles or gravel for drainage
- Activated charcoal (available at garden centers)
- a well-draining potting mix (peat-based for moisture-loving plants; cactus mix for succulents)
- Long tweezers or chopsticks for planting in tight spaces
- Decorative items such as tiny figurines or bark chips (optional)
- Spray bottle for misting
Assembling all materials ahead of time makes the building process smooth and enjoyable.
Step 4: Build the Layered Foundation
Terrariums rely on layers to function well, especially closed ones. Follow these steps:
Start with a 1- to 2-inch layer of small pebbles or gravel. This layer collects excess water and prevents root rot.
Add a thin layer of activated charcoal, about half an inch. Charcoal filters impurities and keeps the environment fresh.
Add a layer of sphagnum moss if you expect soil to seep into the gravel. This prevents clogging.
Top it all with about 2 to 3 inches of potting mix. Use the right mix for your plant type. Keep the surface level and leave space for planting.
Step 5: Position the Plants
Remove plants from their nursery pots and gently tease apart crowded roots. Make small planting hollows instead of traditional holes—this prevents disturbing your layered base.
Use tweezers, chopsticks, or a spoon to place plants precisely. Arrange them intentionally, with taller plants at the back or center and smaller ones up front. Avoid overcrowding to allow airflow and competing root growth.
Once each plant is placed, press the soil gently and mist lightly to help it settle. Take a moment to adjust spacing and rotation angles until the mini landscape feels balanced.
Step 6: Add Decorative Finishes
Earthy terrariums benefit from decorative touches. Miniature figurines, small rocks, bark pieces, or tiny signs add personal flair. For closed terrariums with high humidity, add decorative stones on top of the soil. For succulents, consider top-dressing with gravel or sand to help keep roots dry and enhance visual appeal.
Decoration isn’t necessary, but it makes your terrarium unique—telling a small story in a sealed or open ecosystem.
Step 7: Close or Leave Open
If you’re making a closed terrarium, place the lid snugly to promote a self-contained environment. Open terrariums benefit from airflow, so skip the lid. Even open terrariums should be placed outdoors occasionally to allow powdery mildew to dissipate, especially for succulents.
Step 8: Initial Watering
After the first planting, mist closed terrariums lightly until the soil is just moisture-permeable—not soaked. For open terrariums, water sparingly with a small amount of water in a spray bottle or from the side.
Allow a day or two for soil moisture to stabilize before placing the terrarium in its final location.
Step 9: Determine Proper Lighting
Terrariums thrive in bright, indirect light away from direct sunlight that could overheat the tiny ecosystem. Succulent terrariums should receive more light—ideally filtered or morning sun. Closed terrariums need less light, as moisture can build up and encourage algae or mold.
A few weeks into life, rotate the container so plants grow evenly. You can also place them under LED grow lights if natural light is insufficient.
Step 10: Care and Maintenance
Watch your terrarium regularly. Here’s what to monitor:
For closed terrariums, condensation on the glass is a good sign of proper humidity. If moisture drips heavily, air out the terrarium by removing the lid for a few hours. If glass remains dry, mist lightly.
Remove any yellow or decaying leaves quickly to prevent mold. Use tweezers for precision, especially in tight or sealed containers.
For succulents in open terrariums, mist lightly only when soil is nearly dry. Overwatering is a common issue. Stick to a defined watering schedule, usually once every two weeks or less, depending on container size and humidity.
Clean dirt from glass interiors by gently wiping with a soft cloth. Keep the exterior glass clean to optimize light and display beauty.
Step 11: When and How to Propagate or Repot
Terrariums don’t require frequent repotting, but once plants begin touching the glass or overcrowding, it’s time to update. Remove larger root-bound specimens, trim plants, or replace smaller ones. Closed terrariums rarely need soil refresh—possibly only every two years.
Open succulent terrariums may need soil replacement more often as gravel mixes compact. Carefully uproot, refresh soil, and replant—not a full teardown.
Step 12: Troubleshooting Common Issues
Mold or algae growth is common and fixable. Remove moldy bits and add a small fan to improve airflow. Avoid low-light, high-humidity setups.
Plant wilting in closed terrariums often means too little air or too much moisture. Air out occasionally.
Wilted or shriveled succulents in open terrariums typically signal underwatering—add water slowly over a few minutes until soil absorbs it.
Yellow leaves in both types often indicate root rot from overwatering or shaded placement. Trim affected areas and adjust light or water.
Design Tips and Plant Selection
Closed terrariums look great with combinations like fittonia, peperomia, baby tears, and moss, arranged like a tropical forest floor.
Open terrariums pair well with succulents of similar habits. Mix echeveria rosettes with low trim지
For intermediate builders, try layering moss, stones, and small fern roots to create mini scenes. Create spiral pathways or stone gardens using gravel to define pathways within your terrarium.
Why Terrariums Are Great Projects
Terrariums are ideal for beginners and experts because they offer control over plant life and environment in a compact format. They’re therapeutic to design, creative to maintain, and resistance teaches care and patience. Plus, terrariums are sustainable—they need little water and can last for years with minimal input.
Final Thoughts
Building a terrarium is more than décor; it’s crafting a self-contained piece of nature. Following these steps ensures you build a healthy and beautiful habitat that thrives for months. As your terrarium grows, you’ll learn how to balance light, moisture, and plant growth—skills that apply to larger gardening projects in the future.
Your terrarium can be a source of pride, conversation, and calm in your daily routine. Ready to begin? Gather your materials, choose a container, and let your creativity bloom in miniature.